- DNS zone transfer options are reset after you change zone replication scope in Windows Server 2008 R2
- Symptoms
- Cause
- Resolution
- Backup script
- Restore script
- More information
- Zone transfer settings storage
- Settings
- Registry
- DS polling thread
- Zone Transfer
- Related terms:
- Layer 7: The Application Layer
- Information Gathering
- MCSA/MCSE 70-291: The Windows Server 2003 DNS Server
- Zone Transfers
- Exam Warning
- Configuring Network Services
- Zone Transfer
- Detecting and Performing Security Breaches with Sniffer Pro
- DNS Zone Transfers
- Configuring DNS
- Manually Initiating Replication Using DNS Manager
- Reconnaissance
- 2.4.2.1 Attempt a DNS zone transfer
- Reconnaissance
- Attempt a DNS zone transfer
- BIND security
- Using TSIG to Sign Zone Transfers
- MCSE 70-293: Planning, Implementing, and Maintaining a Name Resolution Strategy
- Security for Zone Replication
- MCSA/MCSE 70-291: Domain Naming System Concepts
- Standard Secondary DNS Server
DNS zone transfer options are reset after you change zone replication scope in Windows Server 2008 R2
This article provides help to solve an issue where DNS zone transfer options are reset after you change the zone replication scope.
Original product version: В Windows Server 2012 R2
Original KB number: В 4050194
Symptoms
Consider the following scenario:
A domain that is named contoso.com contains two domain controllers, DC1.contoso.com and DC2.contoso.com.
Both domain controllers are Domain Name System (DNS) servers that host the Contoso.com zone.
The zone replication scope is set to the following value:
To all domain controllers in the domain (for Windows 2000 compatibility): contoso.com
The contoso.com zone on DC1 and DC2 is configured to Allow Zone transfers to secondary servers.
You set the zone replication scope to the following value:
To all DNS servers running on domain controllers in this domain: contoso.com

This change is replicated to DC2, and then the contoso.com zone is reloaded by the DNS service on DC2.
In this scenario, the zone transfer settings on DC2 are removed. The following changes occur:
The Allow zone transfers check box is cleared.
The list of servers to which zone transfer was previously allowed is removed. The server values are also removed from the registry.
![]()
When this issue occurs, the zone transfers settings on DC1 are not affected.
Cause
This issue occurs because the existing zone object is deleted from the partition, and a new object is created in the corresponding partition when the replication scope is changed. This change is replicated across all domain controllers.
When the polling thread on DC2 pulls the change from the new partition, the registry settings for are reset. Zone transfer is disabled because the value of SecureSecondaries is set to 3. Also, any configured servers in the zone transfer list are removed because the SecondaryServers value is removed. From a DNS perspective, this process resembles creating a new zone in a different partition.
Resolution
Before you change the replication scope, note the zone transfer settings. Reconfigure the zone transfer settings after the replication scope is changed.
You can also use the following scripts to back up and restore the settings.
These scripts are provided on an as-is basis. We recommend that you thoroughly test these scripts before you use them in a production environment.
Backup script
Save the following code as a file that is named BackupZoneTransferSettings.ps1.
Restore script
Save the following code as a file that is named RestoreZoneTransferSettings.ps1.
The backup script backs up the zone transfer settings for a particular zone. (For convenience, the backup is stored in the registry under the HKEY_CURRENT_USER hive.)
You can run the Set-ExecutionPolicy PowerShell cmdlet to allow unsigned scripts.
The second command (highlighted) in the following screenshot takes a backup of the zone transfer settings for the zone that is named «test3.com.»
![]()
Where the settings are backed up to in the registry
Running the script to restore the zone transfer settings (the restore script restores these two values only)
![]()
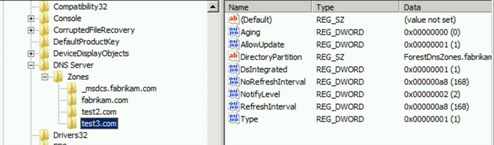
Zone transfer settings in the registry before the restore operation
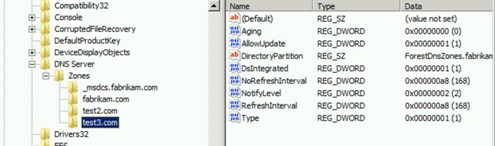
Zone transfer settings in registry after the restore operation

After you run the restore script, you must restart the DNS service to apply the changes.
More information
Zone transfer settings storage
The zone transfer settings are stored in the registry on the DNS server in the following path:
HKLM\SOFTWARE\Microsoft\Windows NT\CurrentVersion\DNS Server\Zones\
When zone transfer is set to specific servers or IP addresses, the following values are populated:
- SecureSecondaries is set to 0x2. This corresponds to the Only to the following servers option.
- A multi-string value that is named SecondaryServers is created by using the IP addresses of the servers.
Settings
![]()
Registry
![]()
The zone transfer settings are not stored in Active Directory. Therefore, the settings don’t replicate as part of Active Directory replication.
DS polling thread
The DNS service maintains a DS polling thread that periodically polls partitions and retrieves the list of all zones. For more information, see How Often Does the DNS Server Service Check AD for New or Modified Data?
By default, the DNS service polls Active Directory for changes every 180 seconds (3 minutes). You can control this process by using the DsPollingInterval registry key or the dnscmd /dspollinginterval switch.
The switch accepts values from 0 to 3,600 seconds. However, values from 1 to 29 are not allowed. The minimum acceptable value is 30 seconds.
Zone Transfer
Related terms:
Download as PDF
About this page
Layer 7: The Application Layer
Information Gathering
Before attempting to attack a machine or network, most attackers collect as much information as they can about their target. DNS can provide a great deal of information about a target network and its hosts. If the network’s DNS is not securely configured, sensitive information such as internal addressing schemes can be discovered.
One of the more common insecure configurations with DNS is allowing anyone to perform zone transfers on one of a domain’s DNS servers. Recall that zone transfers are used to copy a domain’s database from the primary server to the secondary server. If an attacker is able to perform a zone transfer with the primary or secondary name servers for a domain, the attacker will be able to view all DNS records for that domain.
Zone transfers can be performed using a variety of DNS tools, including the nslookup utility discussed earlier. To perform a zone transfer with nslookup, follow these steps in interactive mode:
Find the target domain’s primary name server. This can be accomplished by typing set q = hinfo and then querying the domain name.
After the domain’s primary name server has been determined, set nslookup to use it. This is done by typing server target_server, where target_server is the target domain’s name server.
To perform a zone transfer, type set q = any and then ls –d targetdomain. This will output the records that were received by the zone transfer.
With all of the DNS information, it is possible to determine a lot about the network that uses that domain. In addition to discovering internal addressing schemes, it is possible to determine what specific hosts are used for analyzing zone information.
MCSA/MCSE 70-291: The Windows Server 2003 DNS Server
Deborah Littlejohn Shinder , . Laura Hunter , in MCSA/MCSE (Exam 70-291) Study Guide , 2003
 Zone Transfers
 Zone Transfers
The Zone Transfers tab, as shown in Figure 6.42 , is used to configure which DNS servers the master zone will allow to transfer its zone database. The default is to not allow zone transfers because the Allow zone transfers option checkbox is disabled. You have the ability to select one of three options:

Figure 6.42 . Configuring Zone Transfer Security
To any server This allows zone transfers to any server that points to it as its master.
Only to servers listed on the Name Servers tab This allows zone transfers only to zones Listed on the Name Servers tab on the zone’s Properties page. This option tries to limit the number of servers that are authoritative for that zone by allowing zone transfers only to name servers your server has been configured to know about.
Only to the following servers This allows you as an administrator to choose a specific number of DNS servers you wish to allow the transfer of zone data, using other DNS server’s IP addresses.
Exam Warning
 Exam Warning
If using zone transfers in your environment, it is wise to limit the ability to transfer zone data and configure only those servers that you deem appropriate, because DNS zone data can be used by computer hackers as a means to attack your network both physically and socially. If at all possible, use Active Directory (AD) integrated zones and take advantage of the existing AD replication topology, avoiding zone transfers all together.
Configuring Network Services
Zone Transfer
Zone transfer is the process of copying the contents of the zone file on a primary DNS server to a secondary DNS server. Using zone transfer provides fault tolerance by synchronizing the zone file in a primary DNS server with the zone file in a secondary DNS server. The secondary DNS server can continue performing name resolution if the primary DNS server fails. Furthermore, secondary DNS servers can transfer to other secondary DNS servers in the same hierarchical fashion, which makes the higher-level secondary DNS server a master to other secondary servers. Three transfer modes are used in a Windows Server 2008 DNS configuration:
Full Transfer When you bring a new DNS server online and configure it to be a secondary server for an existing zone in your environment, it will perform a full transfer of all the zone information in order to replicate all the existing resource records for that zone. Older implementations of the DNS service also used full transfers whenever updates to a DNS database needed to be propagated. Full zone transfers can be very time-consuming and resource-intensive, especially in situations where there isn’t sufficient bandwidth between primary and secondary DNS servers. For this reason, incremental DNS transfers were developed.
Incremental Transfer When using incremental zone transfers, the secondary server retrieves only resource records that have changed within a zone, so that it remains synchronized with the primary DNS server. When incremental transfers are used, the databases on the primary server and the secondary server are compared to see if any differences exist. If the zones are identified as the same (based on the serial number of the Start of Authority resource record), no zone transfer is performed. If, however, the serial number on the primary server database is higher than the serial number on the secondary server, a transfer of the delta resource records commences. Because of this configuration, incremental zone transfers require much less bandwidth and create less network traffic, allowing them to finish faster. Incremental zone transfers are often ideal for DNS servers that must communicate over low-bandwidth connections.
DNS Notify The third method for transferring DNS zone records isn’t actually a transfer method at all. To avoid the constant polling of primary DNS servers from secondary DNS servers, DNS Notify was developed as a networking standard (RFC 1996) and has since been implemented into the Windows operating system. DNS Notify allows a primary DNS server to utilize a “push” mechanism for notifying secondary servers that it has been updated with records that need to be replicated. Servers that are notified can then initiate a zone transfer (either full or incremental) to “pull” zone changes from their primary servers as they normally would. In a DNS Notify configuration, the IP addresses for all secondary DNS servers in a DNS configuration must be entered into the notify list of the primary DNS server to pull, or request, zone updates.
Each of the three methods has its own purpose and functionality. How you handle zone transfers between your DNS servers depends on your individual circumstances.
Remember that full and incremental transfers actually transfer the data between the DNS servers, and that DNS Notify is not a mechanism for transferring zone data. It is used in conjunction with AXFR (Full Transfer) and IXFR (Incremental Transfer) to notify a secondary server that new records are available for transfer.
Let’s take a look at how to create a new DNS zone:
Choose Start | Administrative Tools | DNS.
In the console tree, double-click your server, and then click Forward Lookup Zones.
Right-click Forward Lookup Zones, and then select New Zone.
The New Zone Wizard appears. Click Next (see Figure 1.9 ).

Figure 1.9 . The New Zone Wizard
On the Zone Type page, click Primary zone and then click Next.
On the Active Directory Zone Replication Scope page, click Next.
On the Zone Name page, in the Name field, type a name for a test zone ( Figure 1.10 ), and then click Next.

Figure 1.10 . The Zone Name Page
On the Zone File page, click Next.
On the Dynamic Update page, choose Allow Both Nonsecure And Secure Dynamic Updates and click Next.
Normally, when configuring Dynamic Updates, you should choose the Secure Only option. For lab purposes in this book, however, you can choose Allow Both Nonsecure And Secure Dynamic Updates.
On the Completing The New Zone Wizard page, click Finish.
Detecting and Performing Security Breaches with Sniffer Pro
DNS Zone Transfers
A DNS zone transfer is basically a file transfer of the zone database from a primary to a secondary server when notified. How often these transfers should occur depends on how static your namespace remains. A network with frequent changes should have shorter period between transfers. Be aware that a large zone transfer can become a recourse hog and overload the network. With that in mind, zone transfers are necessary, but their schedules should be the result of careful planning.
From a security point of view, DNS zone transfers offer a wealth of reconnaissance information. With this information, a hacker can map your network in preparation for an attack. Most system administrators prefer to use a name that is descriptive for each server in their networks. Names such as PrimeDC, WINServer, PrimeDNS, and PayrollSVR save the hacker a great deal of time in determining which unit to compromise. If the hacker can cause and capture a full zone transfer, it is a relatively simple matter to construct a map of the entire zone. Armed with this information, a hacker can begin rerouting packets to other locations or create a man-in-the-middle attack, which we discuss next.
Configuring DNS
Manually Initiating Replication Using DNS Manager
To manually initiate a zone transfer using DNS Manager follow these steps:
Open DNS Manager by clicking Start | Administrative Tools | DNS
Expand the appropriate server node, expand Forward Lookup Zones or Reverse Lookup Zones, right-click the desired zone, and click one of the following options: ▪
Transfer from Master. This option asks the secondary or stub zone to check its master and determine if it is up to date. If it isn’t, a zone transfer to obtain any updates will be initiated.
Reload from Master. This option requests a transfer of the entire zone from the master. It is most often used when some form of corruption has occurred in the secondary or stub zone. Because it transfers all records, it uses more bandwidth and is not recommended except when absolutely necessary.
Reconnaissance
2.4.2.1 Attempt a DNS zone transfer
Zone transfers are typically used to replicate DNS data across a number of DNS servers, or to back up DNS files. A user or server will perform a specific zone transfer request from a name server. If the name server allows zone transfers to occur, all the DNS names and IP addresses hosted by the name server will be returned in human-readable ASCII text.
Clearly, this mechanism suits our purposes at this point admirably. If the name server for a given domain allows zone transfers, we can simply request—and collect—all the DNS entries for a given domain. If this works, we can perform the same task for other domains that we have identified and move on to the next phase of the attack.
The basic method of performing a zone transfer from a UNIX environment is to use the host command. We will go through the use of this tool in detail later, but you should be aware that the chances that a zone transfer will succeed on the Internet are relatively low. One of the most basic principles of securing DNS is to disable zone transfers, but you’ll still find a few cases where this has been missed. If so, you can use a zone transfer to quickly gather all the IP/host name combinations that the name server is hosting. In most cases, unfortunately, you’ll have to roll up your sleeves and get on with it the hard way.
Many people aren’t aware that the access restrictions on DNS zone transfers are a function of the DNS server, and not of the DNS domain. Why is this important? More than one host may be configured to serve a particular domain. If even one allows zone transfers, your attempts will succeed—there is no global setting for the domain itself.
It’s also important to note that not all the hosts configured to serve DNS for a particular domain will be registered as name servers for that domain in the upstream DNS. It’s not uncommon to find hidden primaries, backup servers, internal servers, and decommissioned servers that will serve DNS for a domain even though they’re not registered to do so. These machines are often not as well configured and may allow zone transfers.
The question then becomes, how do you find a name server if it’s not registered? In Chapter 3 , we cover vitality scanning and port scanning. A host that responds on Transmission Control Protocol (TCP) port 53 is probably a name server and may allow zone transfers. If you have scanned a subnet for a target and found additional hosts with this port open that are not registered, you may have found a hidden DNS server.
Finally, you should be aware that a given domain will probably have more than one name server serving it. Not all DNS query clients will necessarily attempt to query all the servers, especially if the first one responds. Be sure you know how your chosen query client handles multiple name servers, and be prepared to specify each individual server by hand if necessary. This may cause the scan to take longer, but may provide additional details depending on the configuration of each server.
Reconnaissance
Attempt a DNS zone transfer
Zone transfers are typically used to replicate DNS data across a number of DNS servers or to back up DNS files. A user or server will perform a specific zone transfer request from a name server. If the name server allows zone transfers to occur, all the DNS names and IP addresses hosted by the name server will be returned in human-readable ASCII text.
Clearly, this mechanism suits our purposes at this point admirably. If the name server for a given domain allows zone transfers, we can simply request and collect all of the DNS entries for a given domain. If this works, we can perform the same task for other domains that we have identified and move on to the next phase of the attack.
The basic method of performing a zone transfer from a UNIX environment is to use the host command. We will go through the use of this tool in detail later, but you should be aware that the chances that a zone transfer will succeed on the internet are relatively low. One of the most basic principles of securing DNS is to disable zone transfers, but you’ll still find a few cases where this has been missed. If so, you can use a zone transfer to quickly gather all the IP/host name combinations that the name server is hosting. In most cases unfortunately, you’ll have to roll up your sleeves and perform this task the hard way.
Many people aren’t aware that the access restrictions on DNS zone transfers are a function of the DNS server, and not of the DNS domain. Why is this important? More than one host may be configured to serve a particular domain. If even one allows zone transfers, your attempts will succeed as there is no global setting for the domain itself.
It’s also important to note that not all the hosts configured to serve DNS for a particular domain will be registered as name servers for that domain in the upstream DNS. It’s not uncommon to find hidden primaries, backup servers, internal servers, and decommissioned servers that will serve DNS for a domain even though they’re not registered to do so. These machines are often not as well configured and may allow zone transfers.
The question then becomes, how do you find a name server if it’s not registered? In Chapter 3, Scanning and Enumeration , we cover vitality scanning and port scanning. A host that responds on Transmission Control Protocol (TCP) port 53 is probably a name server and may allow zone transfers. If you have scanned a subnet for a target and found additional hosts with this port open that are not registered, you may have found a hidden DNS server.
Finally, you should be aware that a given domain will probably have more than one name server serving it. Not all DNS query clients will necessarily attempt to query all the servers, especially if the first one responds. Be sure you know how your chosen query client handles multiple name servers and be prepared to specify each individual server by hand if necessary. This may cause the scan to take longer but may provide additional details depending on the configuration of each server.
BIND security
Allan Liska , Geoffrey Stowe , in DNS Security , 2016
Using TSIG to Sign Zone Transfers
To further enhance the security of zone transfers BIND allows the use of Transaction SIGnatures (TSIG) for transaction-level authentication. TSIG enforcement can be used for queries, transfers, and updates. This section will examine how to enforce TSIG for zone transfers.
TSIGs use a combination of shared secrets and one-way hashing to confirm that the host making the request is authorized to access the data. DNS queries are trivial to spoof, enabling TSIGs between primary and secondary authoritative name servers helps to provide a second form of authentication (the first being that the requesting IP address is one that is allowed to request transfers, based on enabled ACLs).
In order for a TSIG transaction to work, the first step is to generate a shared secret key. They key can be created manually (as long as it is properly base-64 encoded) or generated any number of ways including using the built-in functionality of the BIND server:
dnssec-keygen -a hmac-sha512 -b 256 -n HOST cryptodns-key
This command generates a HOST key using the HMAC-SHA512 message authentication code that is 256 bits in length and stored in a file called cryptodns-key. The command, in this case, generated a shared secret key that looks like this:
The next step is to add the key to the named.conf file of both the primary and the secondary name servers:
Obviously, publishing a shared secret key like this in an insecure named.conf file defeats the purpose of securing the transactions in the first place. It is important to ensure that access to the named.conf file is restricted and only the BIND user has access to read/write to the file. If that is not possible, because multiple users need to make edits to the named.conf file, it is possible to store the key in a separate, more restricted, file. DNS administrators can then just add the key file through an include statement in the named.conf file:
The next step is to get the two hosts to use the newly generated key when making rests. Using the example above of ns1.cryptodns.com being assigned IP address 192.168.1.15 and ns2.cryptodns.com being assigned IP address 10.100.50.8, there are two statements needed. On ns1.cryptodns.com, the statement would look like this:
On ns2.cryptodns.com, the statement would be the opposite:
Now all DNS queries between the two hosts will include the TSIG hash from the shared secret (the shared secret is never passed between the two hosts).
Finally, in order to prevent transfers to hosts that do not have the proper key information the following line can be added to the options section of named.conf:
Now, all transfer requests require the proper hash before they will be responded to, and since that hash is only allowed from a specific IP address, the request must have the right hash and originate from the correct IP address.
MCSE 70-293: Planning, Implementing, and Maintaining a Name Resolution Strategy
Martin Grasdal , . Dr. Thomas W. Shinder , in MCSE (Exam 70-293) Study Guide , 2003
Security for Zone Replication
It is also important to ensure that zone replication traffic is secure, especially in situations where standard zone transfers are occurring over the Internet. To secure zone replication, you can configure Microsoft DNS to transfer zone information to only those servers that are found in the zone’s name server list. However, you can further tighten security by specifying individual IP addresses that are allowed to receive zone transfers.
In situations where you are transferring zone transfer information over the Internet or you are concerned that this traffic can be intercepted, you should also consider using Virtual Private Network (VPN) tunnels or Internet Protocol Security (IPSec) to encrypt this traffic. Recent versions of BIND can use transactions signatures (TSIG) to secure zone transfers, but Microsoft does not support secure zone transfers to secondary zones. Hence the need for VPN tunnels and IPSec.
Using Active Directory-integrated zones also increases the security of your replication data by ensuring that all DNS servers are registered in AD and by using the security mechanisms inherent in AD replication. The security for zone transfers arises from the security of AD when you use Active Directory-integrated zones. Where possible, you should use Active Directory-integrated zones exclusively to improve performance and security of zone replication traffic.
MCSA/MCSE 70-291: Domain Naming System Concepts
Deborah Littlejohn Shinder , . Laura Hunter , in MCSA/MCSE (Exam 70-291) Study Guide , 2003
Standard Secondary DNS Server
A standard secondary DNS server is one that contains a copy of the primary DNS server’s zone database. It is replicated via a process called zone transfer , discussed earlier in this chapter. Many organizations configure secondary DNS servers to provide fault tolerance. If the primary DNS server is down, name resolution can be handled by the secondary DNS server(s) until the primary DNS server is restored. In addition to fault tolerance, configuring a secondary DNS server can be configured at a remote location with a large number of clients—a branch office, for instance. When those remote clients are configured to try the secondary DNS server first, name resolution traffic across the WAN is reduced. Name queries across a slower wide-area network can slow down local traffic and, obviously, increase WAN traffic as well. A third reason many organizations implement secondary DNS servers is to reduce the load on the primary DNS server. If a large number of clients are trying to simultaneously access name resolution services, the primary DNS server may get bogged down. Users may experience slow name resolution services through the perception that the network is slow. Configuring secondary DNS servers can help mitigate this effect.
Standard secondary DNS servers behave just like primary DNS servers except they cannot make updates to their zone information. Changes must be made on the primary zone and replicated out to secondary DNS servers. A server from which zone files are replicated can be either a primary or secondary server for the zone, and is often referred to as a master server. When a secondary DNS server starts up, it initiates a zone transfer from the master DNS server. It also checks periodically for updates on the master DNS server. If changes have been made, it initiates a zone transfer. As we discussed earlier, master servers in Active Directory integrated zones (discussed later in this chapter) can also push changes out to secondary servers when changes to the database have been made.

We use cookies to help provide and enhance our service and tailor content and ads. By continuing you agree to the use of cookies .


